Automata Trigger Details
Understanding how Automata’s trigger features work will make it easier to create message automations for a wide range of events.Here, we will explain each trigger feature, so that you can make full use of them in your automations.
When you open a new or existing trigger, you are taken to the trigger overview tab. There is a blue “Actions” button that allows you to archive or duplicate the trigger.

Further down the page, you will find the Trigger Details and Trigger Conditions. Adjusting the features in these sections will give you control over a wide range of automated responses. Here is what the Trigger Details looks like, along with and explanation of each feature.
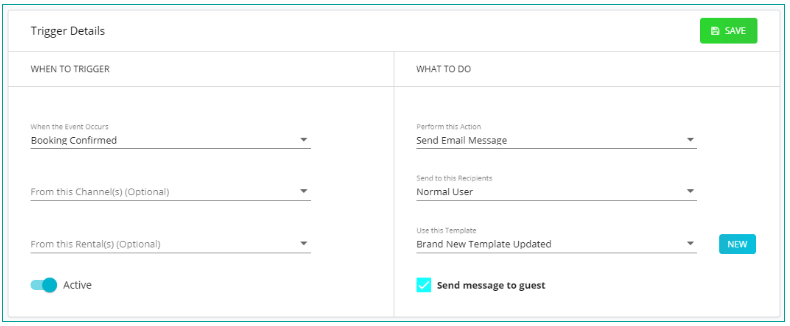
When this Event Occurs:
Select event that will trigger your template being sent.
- Guest Created: Guest is created either via the dashboard, from an Automata website or widget, or from a channel connection.
- Guest Updated: Guest is updated via the dashboard or a channel connection.
- Guest Deleted: Guest is deleted from the dashboard.
- Guest Message: Message is received from a guest
- Inquiry Created: Inquiry is created via the dashboard, an Automata website or widget, or an API channel connection.
- Booking Confirmed: Booking confirmed via dashboard or connected API channel
- Booking Cancelled: Booking cancelled via dashboard or connected API channel
- Hold Created: Hold event is created via the dashboard or connected iCal channel
- Hold Deleted: Hold event is deleted via the dashboard or connected iCal channel
- Invoice Created: Invoice is created via the dashboard or trigger.
- Invoice Paid: Invoice is successfully paid.
- Invoice Cancelled: Invoice is cancelled via the dashboard.
- Contract Signed: Contract is successfully signed and submitted.
- Contract Rejected: Contract is rejected.
- Time-based events: Specify an action that occurs at a particular time around another event.
- iCal Import Error: Inform your internal team that an error was received from a connected iCal channel, and that action needs to be taken by your team in Tokeet.
- Critical Error: Inform your internal team that an account error was received, and that action needs to be taken by your team in Tokeet.
- Channel Disabled: Inform your internal team that a channel connection is disabled, and that action needs to be taken by your team in Tokeet.
From this Channel(s) (Optional):
If selected, the trigger will fire only for event on this channel(s). If you do not select a channel, the trigger will fire for all channels. We recommend leaving this option deselected, unless you need to exclude certain channels from the trigger.
From this Rental(s) (Optional):
If selected, the trigger will fire only for event on this rental(s). If you do not select a rental, the trigger will fire for all rentals. We recommend leaving this option deselected, unless you need to exclude certain rentals from the trigger.
Perform this Action:
Select the action that will be performed when the trigger fires. The action selected determines the kind of template that can be used.
- Send Email Message: This will send a message to the guest or recipient’s email address. If the address is a guest email address from the channel, then the message will be sent using the channel messaging system.
- Send Contract: This will send a contract to the guest or recipient’s email address. If the address is a guest email address from the channel, then the message will be sent using the channel messaging system.
- Send Form: This will send a form to the guest or recipient’s email address. If the address is a guest email address from the channel, then the message will be sent using the channel messaging system.
- Send SMS Message: This will send a SMS message to the guest or recipient’s phone number. This number should be have the country code, followed by the rest of the local phone number. There should not be a + sign or any lead zeros.
- Send HTTP Post: This will send text codes to a receiving server. The server that receives the HTTP post can then operate on the data according to your setup.
- Send Push Notification: This will send a push notification message to the recipient via the Tokeet mobile app. This option will not work with guests, owners or accountant users, as they do not have access to the mobile app.
Send to this Recipient(s) (Optional):
If selected, the trigger will send a copy of the template to the recipient(s) selected. These will be users you have created in your account. Select the internal users you want to receive the message template.
Use this Template:
Triggers require message templates to work. Select a message template, or create a new one. Click “New” to build a new message template. (Read more here)

You can add additional conditions to control when the trigger will fire. Click “New” and complete the required fields. (Read more here)

When all fields have been completed, click “Save”.
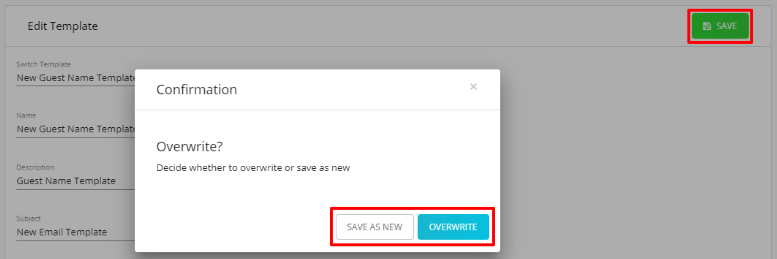
You can also modify an existing template after you select it. After selecting a template in the Trigger Details, click the “Template” tab to make changes to the selected template, or to select a new template.

Changes made to the template can be changed. Once you have finalized your template, click "Save" to either “Update” the existing template, or give it a name and “Save As New”.
You can view the Activity Logs for each trigger in order to see the record of the trigger’s firings and changes. To view the logs, click the “Activity” tab.

You can adjust how many triggers are shown per page by changing the page settings at the foot of the table.
